RoboTeam Landing Page
Introduction
System Architecture
The landing page consists of these parts:
- Reverse Proxy (Nginx): Acts as the entry point. It handles SSL termination and routes traffic to the Vue.js static files or the Spring Boot API.
- Frontend (Vue.js): A Single Page Application (SPA) that handles the UI and user interactions.
- Backend (Spring Boot): The RESTful API that handles business logic, database transactions, and security checks.
- Database (PostgreSQL): Persistent storage for news, team members, and configuration.
- Containerization (Docker): Everything is wrapped in Docker containers
Which is easier to understand with following diagram: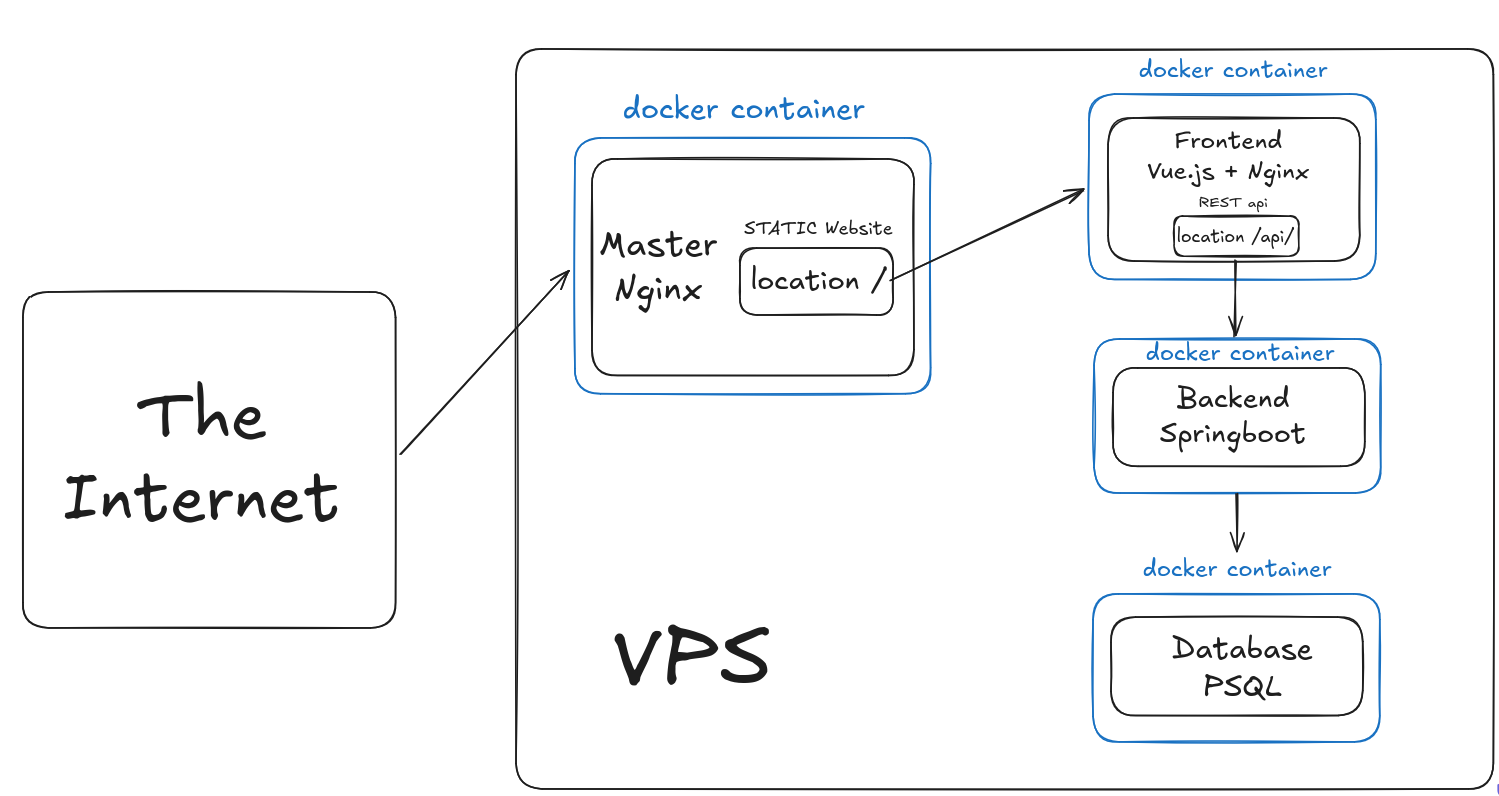
Admin Dashboard
Our system implements a two-tier auth system to log in.
- The Super User: One hard-coded or environment-variable-based account used for initial setup or emergency access.
- Google OAuth 2.0:
- The Whitelist: Access isn't open to any Google account. Only emails ending with
@roboteamtwente.nlare permitted. - Logic: When a user logs in, the backend checks if the returned Google email exists in the authorized list. If it’s not there, the Spring Boot Security filter returns a
403 Forbidden.
- The Whitelist: Access isn't open to any Google account. Only emails ending with
*Adding new users to authorized list: while everyone is technically allowed to login if they are have a @roboteamtwente.nl email, you still have to add them to website's whitelist. It is done in "User Managing" tab on admin's dashboard. It is possible to have a user listed, though deactivated, for book keeping reasons.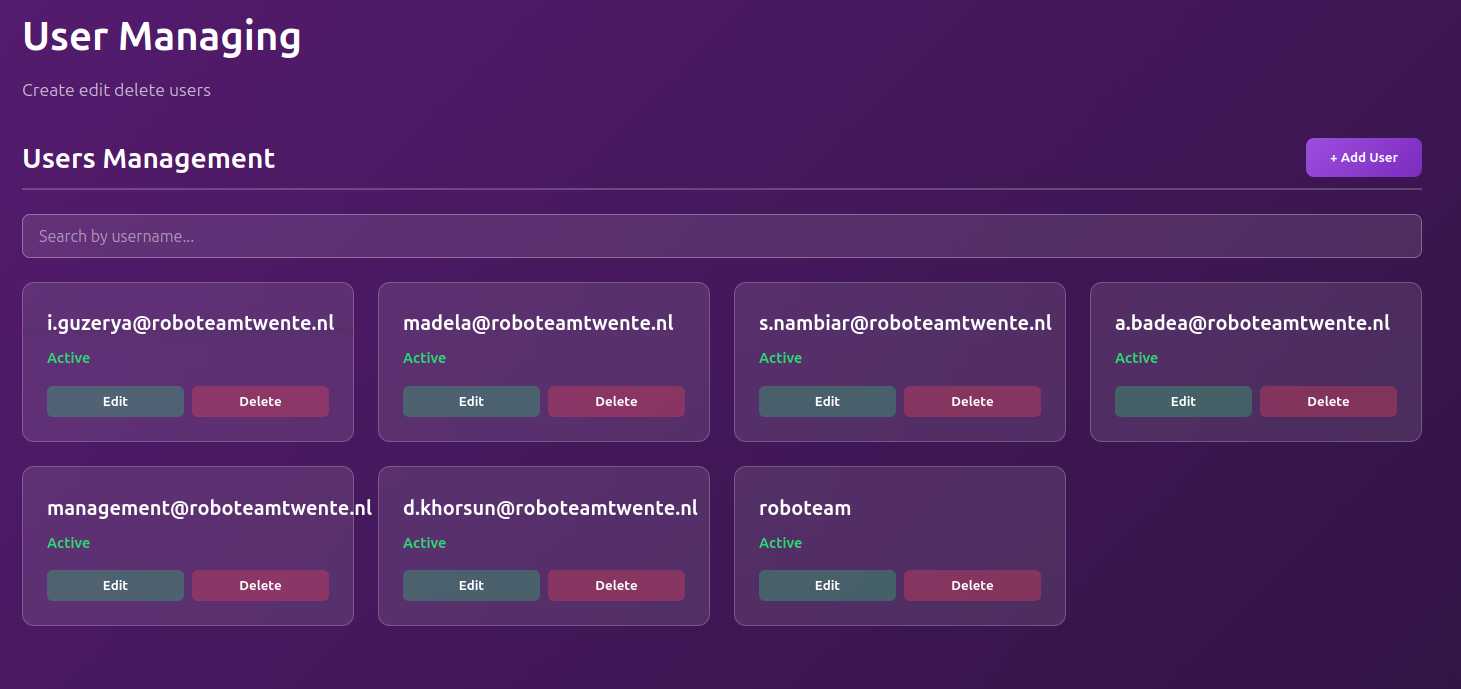
Admin Panel & Content Management
The website isn't just a static landing page; it’s a dynamic CMS. Almost all pages hold content that you are able to edit and manage through the admin panel.
Deployment
1. Docker Compose Services
Our docker-compose.yml runs four key services
Service | Image/Build | Role |
|
| Nginx server; handles port 80 and proxies |
|
| The Spring Boot REST API. |
|
| Relational database. |
|
| Custom service that runs automated DB dumps via crontab. |
2. Maintenance Commands
To help a new dev manage the site, here are the main commands:
- Start everything:
docker compose up -d - Stop everything:
docker compose down(you can add -v flag to delete all volumes) - View Backend Logs:
docker compose logs -f backend - Check Backups: Logs are stored in
./db_backup/logsand actual dumps are in./db_backup/backups. - Build: When in frontend/ or backend/ route directories use:
docker build . -t roboteamtwente/website-{name, e.g. "frontend"}:{version} - Pushing: First login to RoboTeam docker account on your device. Then ->
docker push roboteamtwente/website-{name, e.g. "frontend"}:{version}
3. Deployment
When you are done developing, please consider building the images of services and push them.
After that you are able to ssh into our VPS that hosts a lot of products (main landing page included).
ssh user@h2960363.stratoserver.netYou have to add your user to that VPS's whitelist beforehand in order to login.
In there:
sudo -ito switch to superuser.cd dockerto the main directory where all containers are started from.vim docker-compose.ymland edit the used version of desired service(s) to the newest one.docker pull roboteamtwente/name:versionpull desired updated imagesdocker compose up -d nameOfTheContainerstart the container(s)
Frontend Architecture & API Integration
Here, the frontend of our web page is going to be discussed. Please get familiar with VUE.js documentation if you haven't done so yet:
https://vuejs.org/guide/introduction
A RESTful API guide could also be useful:
https://restfulapi.net/
Our frontend is a Single Page Application (SPA) built with Vue.js. We use a modular structure where every page and component encapsulates its own HTML, CSS, and JavaScript logic.
1. Directory Structure & Organization
We separate the code based on its “responsibility” in the app.
Directory | Purpose |
| The main page containers. These are “Smart” components that usually handle data fetching for a whole page (e.g., |
| Reusable UI sections. These are “Dumb” or “Presentational” components (e.g., |
| Specialized management modules for the Admin Dashboard. These handle the CRUD logic for news, teams, and members. |
| The API layer. All communication with the Spring Boot backend happens here. |
| The navigation logic. Maps URLs to specific Views. |
2. Routing (Adding New Pages)
// src/router/index.js
const router = createRouter({
  history: createWebHistory(import.meta.env.BASE_URL),
  routes: [
    {
      path: "/",
      name: "home",
      component: HomeView,
    },
    // Add new routes here
  ]
})
3. Communication with Backend (API Service)
We never make direct fetch or axios calls inside a .vue component. Instead, we use a centralized service layer in src/services/api.js. This allows us to manage global headers, authentication tokens, and base URLs in one place.
Step 1: Register the API Endpoint
export const aboutUsAPI = {
  get: () => apiRequest("/organization"),
  update: (id, data) =>
    apiRequest(`/organization/${id}`, {
      method: "PUT",
      body: JSON.stringify(data),
    }),
};
Step 2: Use the API in a Component
import { aboutUsAPI } from '@/services/api';

const fetchOrganization = async () => {
  try {
    const data = await aboutUsAPI.get();
    // Do something with data...
  } catch (err) {
    console.error("API Error:", err);
  }
};
4. Admin Panel Architecture
The Admin Panel follows a “Manager” pattern. The AdminView.vue acts as the main wrapper, while the actual editing tools are found in src/components/admin/.
Managers: Components like NewsManager.vue or EventsManager.vue contain the forms and logic needed to edit content.
Data Flow: Typically, a Manager fetches data on mount, allows the user to edit it, and sends a PUT or POST request back through the services/api.js layer.
5. TODO: COOKIES, TOKEN BASED SESSIONS
Backend & Infrastructure
This page covers the core parts of the backend whicih works with Spring Boot.
Consider taking a proper look at the SpringBoot's documentation. It is not hard, most of the backend code are basic spring boot elements and concepts
https://docs.spring.io/spring-boot/index.html
1. Technical Core
- Language/Framework: Java 21 (Eclipse Temurin) using Spring Boot 3.4.0.
- Build System: Gradle. The project is built inside the container using
./gradlew build. - API Port: The backend runs internally on port
8081.
2. The Bootstrap Logic (Admin Seeder)
We have a custom safety mechanism called AdminUserSeeder.java.
- The Purpose: If the database is fresh (0 users), the app will automatically create a "Super User."
- Requirement: You must provide
ADMIN_USERandADMIN_PASSenvironment variables in your.envfile for the first startup. - Behavior: If an admin already exists in the
admin_userstable, this seeder does nothing.
3. Security & Session Management
We use a hybrid security model to ensure the team can always access the dashboard.
- Google OAuth 2.0: Primary login for team members. Emails must be whitelisted in the Google Cloud Console.
- Spring Session (JDBC): Unlike standard apps, we store sessions in the PostgreSQL database (table:
SPRING_SESSION).- Benefit: If the backend container restarts or updates, users are not logged out.
- Cookie Policy:
SameSite=LaxandHttpOnlyare enabled.- Note: In full production with HTTPS,
server.servlet.session.cookie.secureshould be set totrue.
- Note: In full production with HTTPS,
4. Database & Persistence
We use PostgreSQL 15 as our source of truth.
- JPA/Hibernate: Configured with
ddl-auto: update. This automatically creates tables based on Java Entities. - File Uploads: News images and team photos are stored in
/app/uploads. - Volumes: To ensure data isn't lost when containers stop, we use two named volumes:
postgres_data: For all SQL records.uploads_data: For all physical images.