**Download:** [https://www.st.com/en/development-tools/stm32cubemx.html](https://www.st.com/en/development-tools/stm32cubemx.html)
## 1) What is it > **STM32CubeMX** is a graphical tool that simplifies the configuration of STM32 products, and generates the corresponding initialization code through a guided step-by-step process. > > [st.com](https://www.st.com/en/development-tools/stm32cubemx.html) In the embedded subteam, we use STM32 Nucleos to make our robot come to life. We use CubeMX to enable these boards to do what we want by **setting the pins** on the physical board and **generating code** that we can use to drive those pins. --- ## 2) Starting a (new) project Once you have successfully installed CubeMX, you can either create or open a project. You will most likely be working with already existing CubeMX projects. **You can open any project by finding the `.ioc` file.** This is the configuration file for any CubeMX project. However, there are some **important settings** that any project needs. --- ### a. New projectWhen creating a NEW project make sure you use the **board selector and NOT the MCU selector** to start your project (given the fact that you will be working with a board). If you don't do this, it will cause problems down the line.
### b. Project Settings ##### **Project Manager > Project** Once you have your project open, navigate to the project manager. - It is important that your **project name is "firmware"**, since this is the name the folder is supposed to have in the embedded structure. (This is platformio configuration related.) - **Do not generate main()**. You should only generate a main function to check what is in there and use it as an example, but when you want to build, you can not have a main function in your auto-generated code. It will conflict with your own main function. - Set the toolchain to **Makefile**. You should not use another toolchain, because the post code generation script uses information from the Makefile! [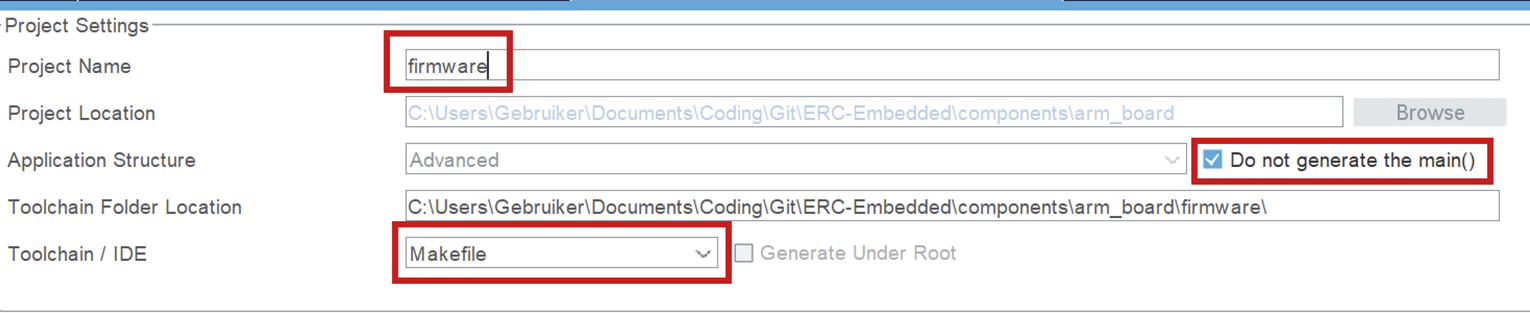](https://bookstack.roboteamtwente.nl/uploads/images/gallery/2026-04/G5rafbeelding.png) ##### **Project Manager > Code Generator** - Click the box to generate **separate files per peripheral**. Otherwise you will encounter errors surrounding missing libraries when building. - Set the after code generation script. It can be found in `scripts/post_code_generation.bash`. More information in [Post-Generation Scripts](https://bookstack.roboteamtwente.nl/books/embedded-infastructure/page/post-generation-scripts "https://bookstack.roboteamtwente.nl/books/embedded-infastructure/page/post-generation-scripts").**NOTE for Windows users:** the post generation script will NOT automatically be ran for you. Instead, you will have to run the script by hand in the **git bash** terminal.
[](https://bookstack.roboteamtwente.nl/uploads/images/gallery/2026-04/WV6afbeelding.png) --- ## 3) Typical Workflow ### a. Configure pins & peripherals - In **Pinout & Configuration**: enable the peripherals you need (UART/SPI/I2C/CAN/Timers/ADC/etc.). - Assign pins and resolve conflicts (CubeMX will warn you). - Configure DMA + NVIC if needed (especially for high-rate IO or RTOS systems). ### b. Set up the clocks - Go to **Clock Configuration** and set your clock source (HSI/HSE) and PLL to the target system frequency. - Verify peripheral clocks (UART baud rates and timer frequencies depend on this). - If USB is used, make sure USB clock requirements are satisfied (CubeMX will usually flag invalid setups). ### c. Code generation **Do not write custom code in CubeMX-generated files.** CubeMX will overwrite generated files during regeneration. Any custom code placed there **will be lost**, even if it appears to work temporarily. **Rule:** - Generated code is **read-only**. - Your code lives **outside** of it. **What to do instead:** - Put all application logic in your own source files (`src/`, modules, drivers, etc.). - Only use generated code as initialization and hardware configuration. - Call your own code from the appropriate entry points (e.g. after init in `main()`). **Bottom line:** If your code depends on surviving a “Generate Code” click, it’s in the wrong place. ### d. Generate code, then build & verify - Open **Project Manager** and confirm the project type/toolchain and output path are correct. - Click **Generate Code**. - Immediately review changes (e.g. `git diff`). If CubeMX changed a lot more than expected, stop and investigate before committing. - Build the firmware and run a basic smoke test (UART prints, LED blink, peripheral init success, etc.)