Getting Started
How to setup and get started working on the embedded code
STM32CubeMX
This page: the short, concrete workflow for using STM32CubeMX to configure an STM32 project and generate init code without accidentally nuking your work.
Download: https://www.st.com/en/development-tools/stm32cubemx.html
1) What is it
STM32CubeMX is a graphical tool that simplifies the configuration of STM32 products, and generates the corresponding initialization code through a guided step-by-step process.
> st.com
In the embedded subteam, we use STM32 Nucleos to make our robot come to life. We use CubeMX to enable these boards to do what we want by setting the pins on the physical board and generating code that we can use to drive those pins.
2) Starting a (new) project
Once you have successfully installed CubeMX, you can either create or open a project. You will most likely be working with already existing CubeMX projects. You can open any project by finding the .ioc file. This is the configuration file for any CubeMX project.
However, there are some important settings that any project needs.
a. New project
When creating a NEW project make sure you use the board selector and NOT the MCU selector to start your project (given the fact that you will be working with a board). If you don't do this, it will cause problems down the line.
b. Project Settings
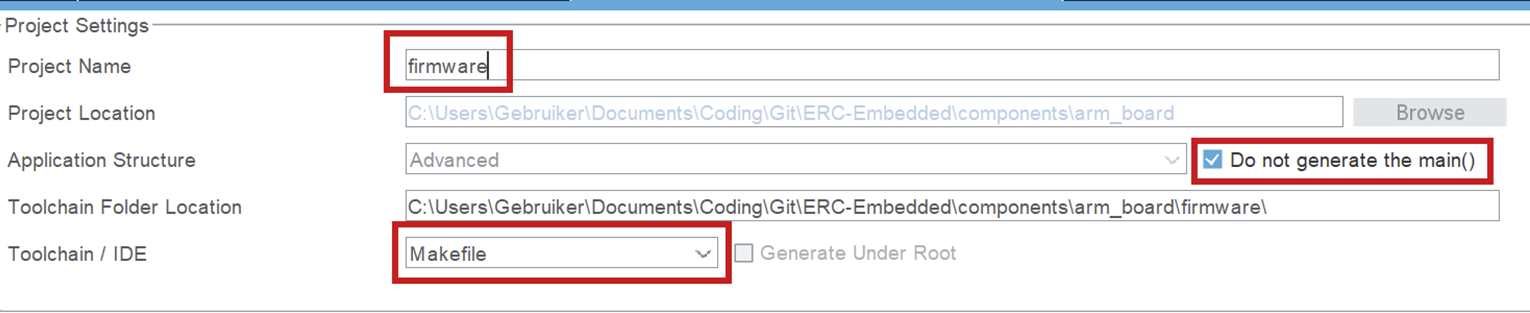
Project Manager > Project
Once you have your project open, navigate to the project manager.
- It is important that your project name is "firmware", since this is the name the folder is supposed to have in the embedded structure. (This is platformio configuration related.)
- Do not generate main(). You should only generate a main function to check what is in there and use it as an example, but when you want to build, you can not have a main function in your auto-generated code. It will conflict with your own main function.
- Set the toolchain to Makefile. You should not use another toolchain, because the post code generation script uses information from the Makefile!
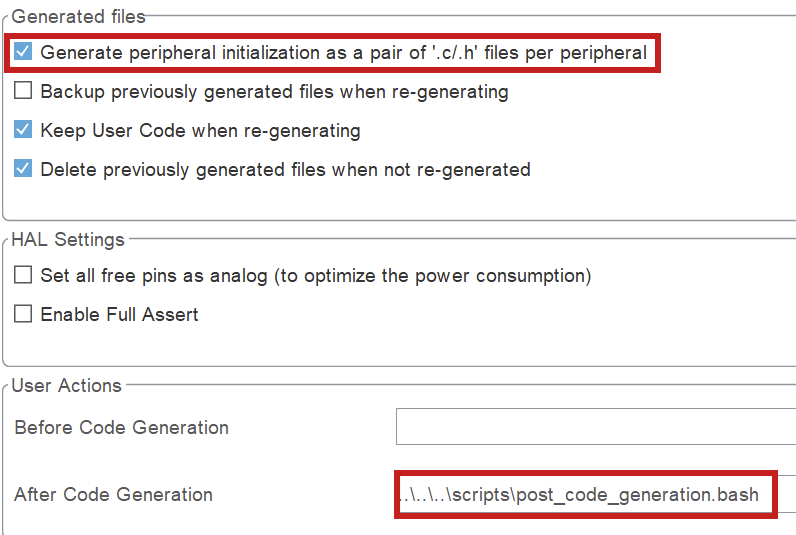
Project Manager > Code Generator
- Click the box to generate separate files per peripheral. Otherwise you will encounter errors surrounding missing libraries when building.
- Set the after code generation script. It can be found in
scripts/post_code_generation.bash. More information in Post-Generation Scripts.
NOTE for Windows users: the post generation script will NOT automatically be ran for you. Instead, you will have to run the script by hand in the git bash terminal.
3) Typical Workflow
a. Configure pins & peripherals
- In Pinout & Configuration: enable the peripherals you need (UART/SPI/I2C/CAN/Timers/ADC/etc.).
- Assign pins and resolve conflicts (CubeMX will warn you).
- Configure DMA + NVIC if needed (especially for high-rate IO or RTOS systems).
b. Set up the clocks
- Go to Clock Configuration and set your clock source (HSI/HSE) and PLL to the target system frequency.
- Verify peripheral clocks (UART baud rates and timer frequencies depend on this).
- If USB is used, make sure USB clock requirements are satisfied (CubeMX will usually flag invalid setups).
c. Code generation
Do not write custom code in CubeMX-generated files.
CubeMX will overwrite generated files during regeneration. Any custom code placed there will be lost, even if it appears to work temporarily.
Rule:
- Generated code is read-only.
- Your code lives outside of it.
What to do instead:
- Put all application logic in your own source files (
src/, modules, drivers, etc.). - Only use generated code as initialization and hardware configuration.
- Call your own code from the appropriate entry points (e.g. after init in
main()).
Bottom line:
If your code depends on surviving a “Generate Code” click, it’s in the wrong place.
d. Generate code, then build & verify
- Open Project Manager and confirm the project type/toolchain and output path are correct.
- Click Generate Code.
- Immediately review changes (e.g.
git diff). If CubeMX changed a lot more than expected, stop and investigate before committing. - Build the firmware and run a basic smoke test (UART prints, LED blink, peripheral init success, etc.)
Git Submodules
On this page
- 1. Why submodules?
- 2. Key concepts
- 3. Cloning a repo with submodules
- 4. Adding ERC-Protobufs as a submodule
- 5. Updating ERC-Protobufs (pinning a new commit)
- 6. Branches, detached HEAD, and what “pinned” means
- 7. Common mistakes
- 8. Command cheat sheet
1) Why submodules?
A git submodule lets one repository “mount” another repository at a specific commit. That sounds fancy, but it’s really just Git saying: “this folder is a separate repo, and we are pinning it to a specific SHA because reproducibility is not optional.”
- should be versioned and reviewed independently,
- must be pinned (reproducible builds, fewer “works on my machine” sightings),
- is shared across multiple firmware/software repositories.
RoboTeam example: ERC-Protobufs can be shared between embedded firmware, tooling, and PC-side code. Pinning ensures everyone generates/uses the same message definitions — which is what prevents “my robot speaks protobuf dialect #3” incidents.
2) Key concepts
Term | What it means | Why care about it? |
|---|---|---|
| A file in the parent repo that stores submodule name/path/URL. | This is what gets committed so everyone else can actually fetch the submodule without guessing. |
“Pinned commit” | The parent repo records a specific commit SHA for the submodule. | Builds are reproducible; updating is an explicit change (and therefore reviewable). |
Detached HEAD | By default, a submodule checks out the exact pinned commit, not a branch. | Normal. It looks scary the first time, but it just means “you’re on a commit, not a branch.” |
| Checks out the submodule commit referenced by the parent repo. | Use after switching branches or pulling changes, because submodules do not magically follow along. |
3) Cloning a repo with submodules
If a repository already uses ERC-Protobufs as a submodule, you must fetch it after cloning. Otherwise Git will politely give you an empty folder and let you discover the problem at build time.
Recommended (one command)
git clone --recurse-submodules <PARENT_REPO_URL>If you already cloned (two commands)
git submodule init
git submodule update
Tip: Add --recursive if the submodule itself contains submodules:
git submodule update --init --recursiveSymptom you forgot submodules: build errors like “file not found”, missing generated headers, missing .proto files, or empty directories where ERC-Protobufs should be.
4) Adding ERC-Protobufs as a submodule
Use this when a parent repository needs to include ERC-Protobufs for builds/code generation. This is a dependency decision, not a casual Friday activity.
Step-by-step
- Choose where it should live in your repo, for example:
third_party/ERC-Protobufs(orlibs/ERC-Protobufs). - Add the submodule:
git submodule add <ERC_PROTOBUFS_REPO_URL> third_party/ERC-Protobufs - Commit the changes:
git add .gitmodules third_party/ERC-Protobufs
git commit -m "Add ERC-Protobufs as a submodule"
What gets committed? (a.k.a. “what did I just do to the repo”)
.gitmodulesfile (submodule metadata)- a “gitlink” entry at
third_party/ERC-Protobufsthat pins a specific commit SHA
The submodule’s full contents are not copied into the parent repo history. You’re committing a pointer, not a copy.
Protocol for RoboTeam: confirm with your lead whether the submodule path is standardized across repositories (helps tooling and scripts, and prevents everyone inventing thirdparty/ in six different spellings).
5) Updating ERC-Protobufs (pinning a new commit)
Updating a submodule means: “the parent repo now points to a newer commit of ERC-Protobufs”. This should be done intentionally and reviewed because it can change message definitions and compatibility. Treat it like an API bump, not like updating a meme folder.
Update flow (safe + explicit)
- Enter the submodule directory:
cd third_party/ERC-Protobufs - Fetch latest commits:
git fetch --all --tags - Check out the desired commit (or a tag):
git checkout <commit-sha-or-tag> - Go back to the parent repo and commit the updated pin:
cd ../..
git status
git add third_party/ERC-Protobufs
git commit -m "Bump ERC-Protobufs submodule to <sha-or-tag>"
Optional (if you want the newest remote-tracking commit): inside the parent repo:
git submodule update --remote --mergeThis requires the submodule to have a branch configured; it is less explicit, so use with care (automation is great right up until it updates something you didn’t mean to update).
Do not “fix” submodule issues by deleting the folder. That often creates messy diffs and makes Git sad. Use actual submodule commands instead.
6) Branches, detached HEAD and what “pinned” means
When you run git submodule update, Git checks out the exact commit recorded by the parent repo. This usually results in a detached HEAD state inside the submodule.
This is normal. A consumer repo typically should not make local changes inside the submodule. If you need to change ERC-Protobufs itself, do that in the ERC-Protobufs repository and then bump the pin in the consumer repo. Submodules are for consuming, not freestyle surgery.
How to tell what commit you are pinned to
# From the parent repo root:
git submodule status
How to see what changed after a submodule bump
# From the parent repo root:
git diff --submodule
7) Common mistakes
“Directory is empty / looks uninitialized”
git submodule update --init --recursive“Submodule shows changes but I didn’t touch it”
Often caused by being on the wrong commit, or having local edits in the submodule. Either way, Git is not gaslighting you — something really is different.
cd third_party/ERC-Protobufs
git status
git reset --hard
git clean -fd
cd ../..
git submodule update --init --recursive
Warning: git reset --hard and git clean -fd will delete local submodule changes. Only do this if you are sure you don’t need them (i.e., you didn’t secretly do work inside the submodule and forget).
“I switched branches and submodules are wrong”
git submodule update --init --recursive“I updated the submodule but forgot to commit in the parent repo”
After updating inside the submodule, you must commit the new pin from the parent repo. Otherwise you updated your local checkout and told nobody, which is the Git equivalent of whispering into the void.
git add third_party/ERC-Protobufs
git commit -m "Bump ERC-Protobufs submodule"
8) Command cheat sheet
Clone with submodules
git clone --recurse-submodules <repo-url>Initialize/update after cloning
git submodule update --init --recursiveShow pinned commits
git submodule statusAdd ERC-Protobufs
git submodule add <erc-protobufs-url> third_party/ERC-Protobufs
git commit -m "Add ERC-Protobufs submodule"
Bump ERC-Protobufs to a specific commit/tag
cd third_party/ERC-Protobufs
git fetch --all --tags
git checkout <sha-or-tag>
cd ../..
git add third_party/ERC-Protobufs
git commit -m "Bump ERC-Protobufs submodule to <sha-or-tag>"
Gaslight your boss :D
(If you need help with abusive bosses reach out @mybrosky_nam, I couldnt do anything about it but I'll try to help you so you don't suffer as well ☮️)