Ethernet Driver
The documentation for the embedded Ethernet driver
- Setup of Embedded Ethernet
- Sending your first message
- Ethernet Testing
- Extra Functions
- Debugging
- Issues
Setup of Embedded Ethernet
This page: How to set up ethernet.
Introduction
Ethernet is the protocol used to communicate between all the components. It uses the auto-generated Ethernet driver code from cubeMX to use the physical Ethernet peripheral. It also uses LWIP to do the lowest levels of packet handling. Lastly, we use freeRTOS for multi threading. The current implementation cannot work without it.
CubeMX
CubeMX is used to automatically generate setup code for the stm32. To use Ethernet you have to set up a few things in cubeMX.
To write this driver I mostly used videos from ControllersTech on YouTube. The most useful video is STM32 Ethernet (Part 1): How to configure Ethernet peripheral and perform successful ping test [1]. So if you do not understand anything, watch that video.
1) ETH
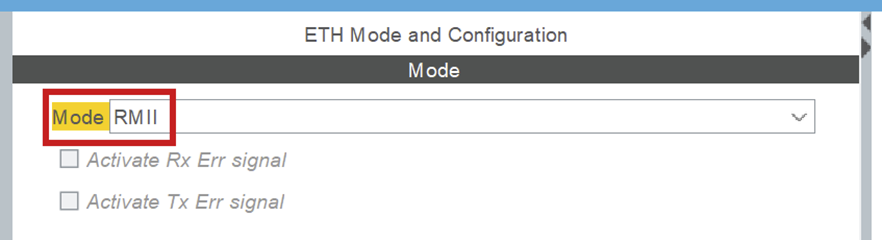
ETH is under connectivity in cubeMX. It sets up the Ethernet peripheral. Set it to RMII mode.
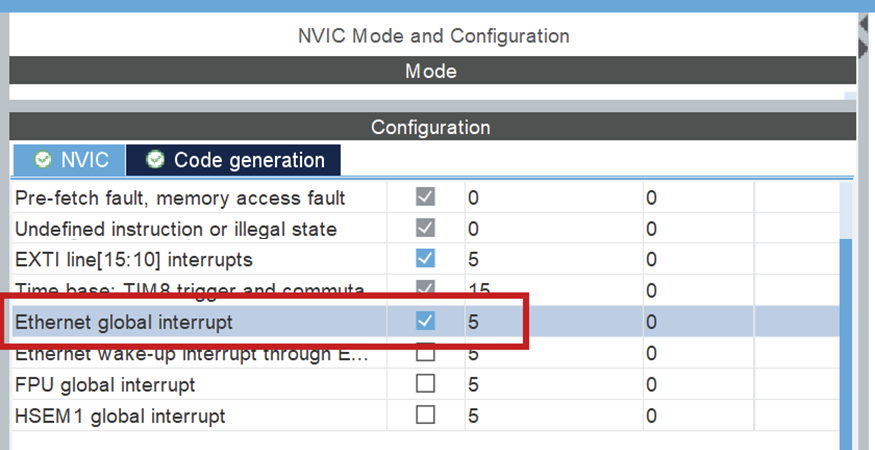
NVIC > NVIC
Turn on Ethernet global interrupt in NVIC settings.
ETH > GPIO settings
When Ethernet is enabled, the pins should automatically be configured according to the below schematic. This can be wrong, please confirm it!
Setup all the PINS like it is done in the PIN schematic (Download: MB1364-H753ZI-C01 Board schematic, pg. 6) [2].
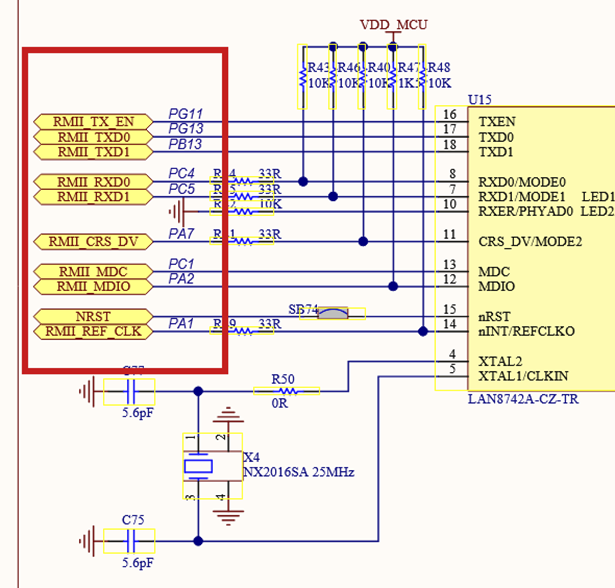
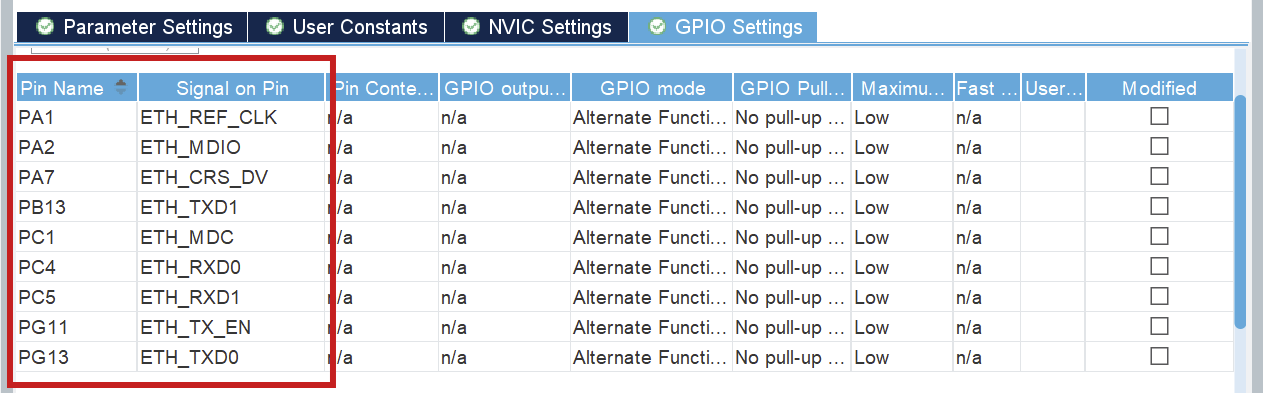
Troubleshooting: Pins not set as schematic
If any of the pins are not as in the schematic, refer to the above information. You can click each pin in CubeMX and choose the correct function (e.g. ETH_RXD0), the other (incorrect) pin will be automatically disabled.
2) LWIP
LWIP is a middleware generated by cubeMX. You can find it under middleware.
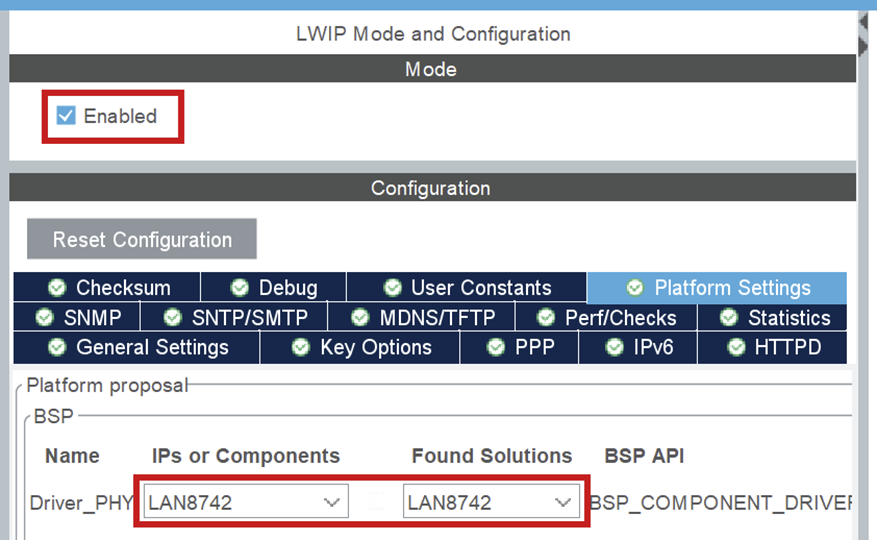
LWIP > Platform Settings
Set up LAN8742, to signal that that is the physical Ethernet driver you use.
LWIP > General settings
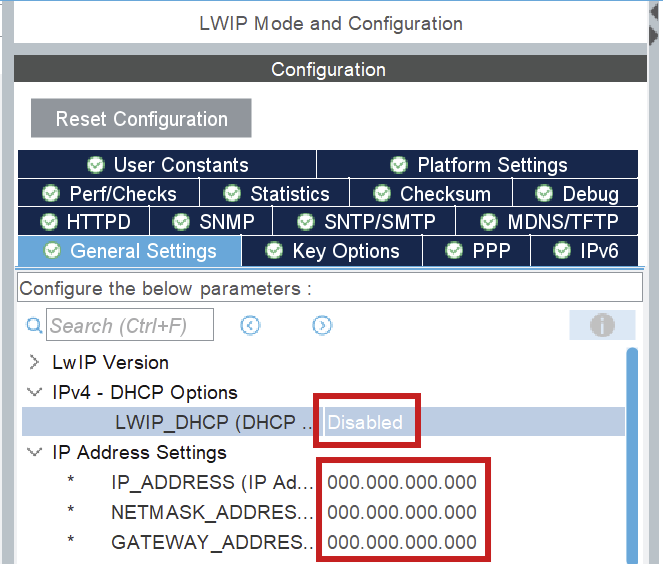
The most important configurations here are the DHCP (DHCP = Disabled) and IP address settings.
The IP address settings don't matter, they will be overwritten in a configuration file in the code.
LWIP > Key options
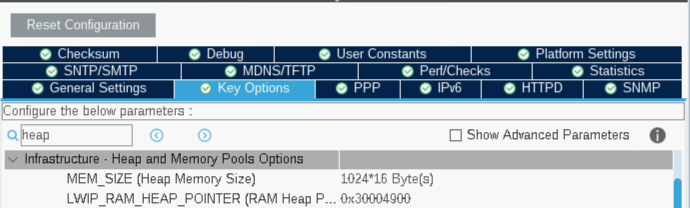
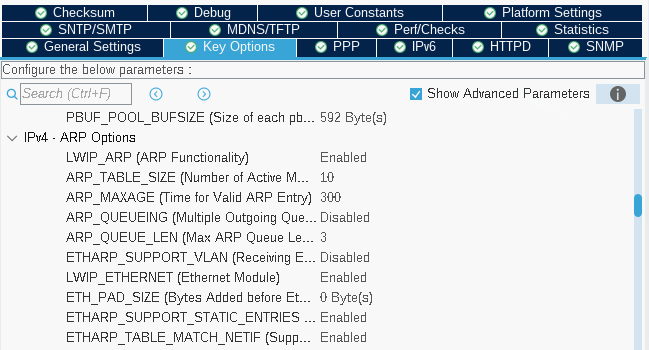
The most important part of the tab Key options is to check if LWIP_ARP = Enabled. You also need to keep track of the MEM_SIZE (Heap Memory Size). Start with a value of 1024*16 bytes. LWIP_RAM_HEAP_POINTER should be 0x30004900 such that the heap doesn't overlap different memory. That is the value I use, but it can be changed if need be.
Lastly, you need to add ETHARP_SUPPORT_STATIC_ENTRIES = Enabled. This is only shown when you turn on Show Advanced Parameters.
3) CORTEX_M7
You can find CORTEX_M7 under System Core.
CORTEX_M7 > Parameter Settings
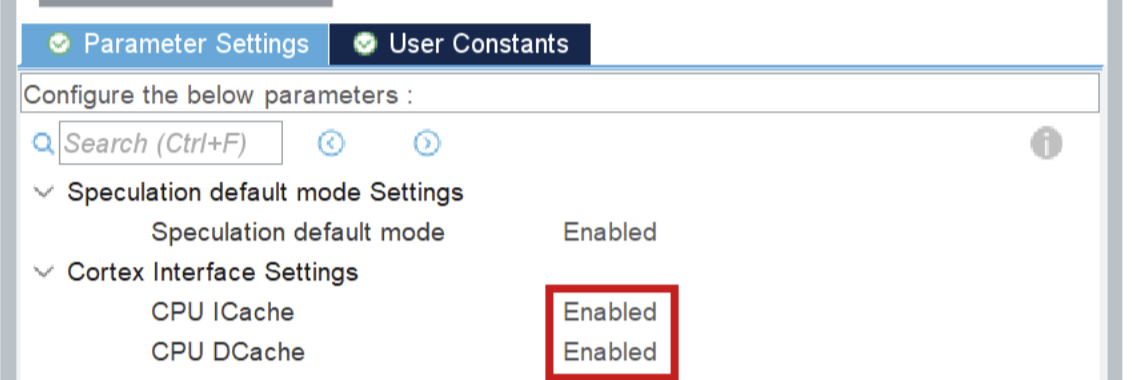
Turn on CPU ICache and CPU DCache.
Setup memory protection like seen below:
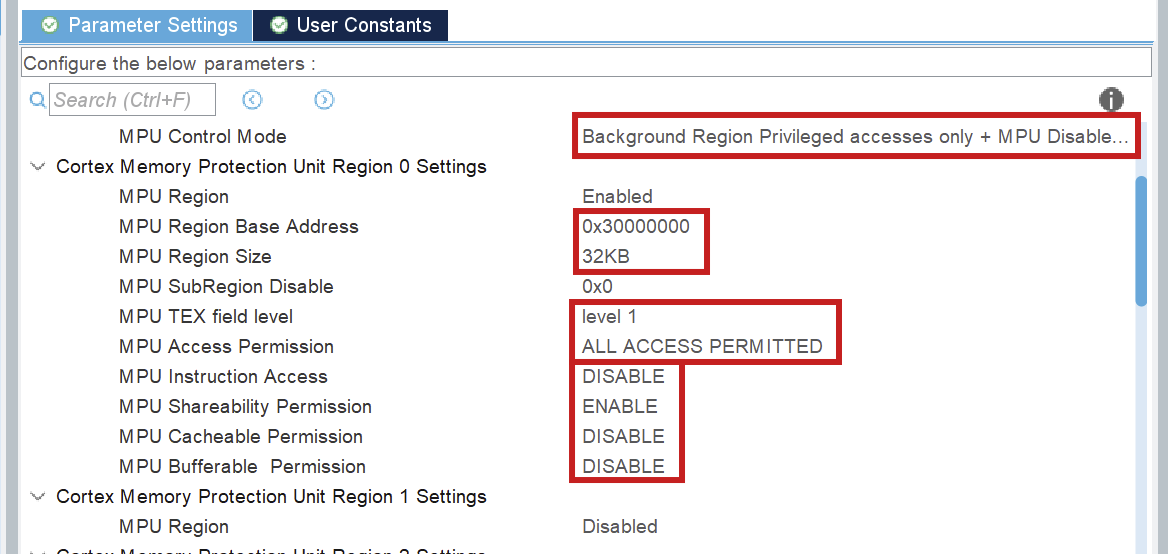
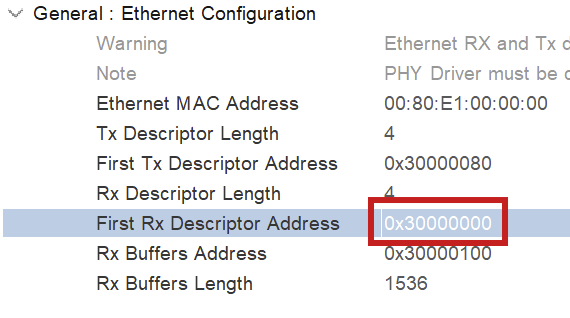
The MPU Region Base Address is the address of the first Rx descriptor (ETH > Parameter Settings > General). The MPU region size is calculated using heap memory size and the RX buffers. Watch the video [1] mentioned above for more information.
4) FreeRTOS
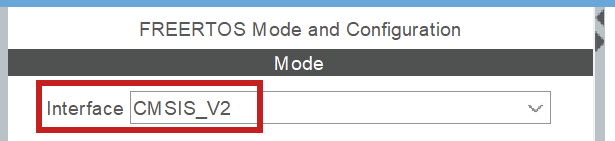
Freertos is automatically integrated in LWIP if you turn it on in cubeMX. It does not have to be modified, it just has to be turned on. Make sure you use CMSIS_V2, because V1 did not work well.
NOTE: when you use FreeRTOS, you will have to select another SYS Timebase Source. Go to SYS > Timebase Source and select any of the free timers, just make sure it is NOT SysTick. Make sure you do not use that timer for any other activities.
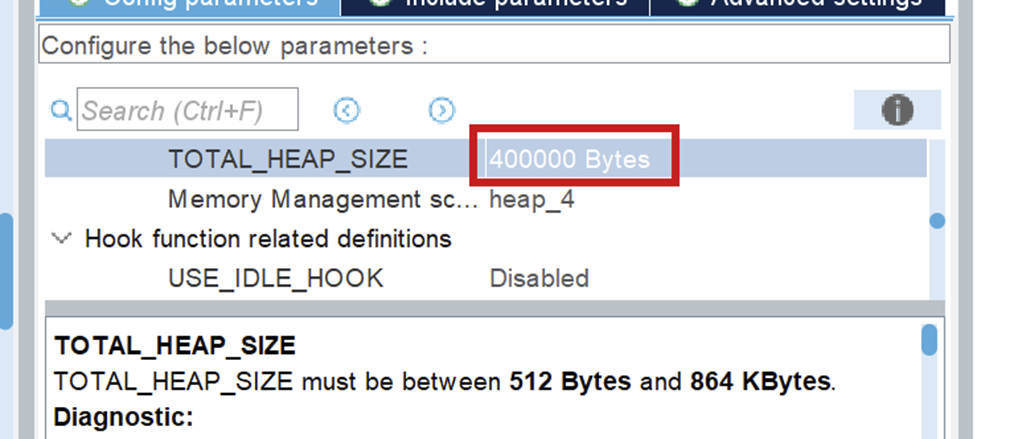
Make sure you set your TOTAL_HEAP_SIZE to a sufficient number. When it is not big enough, the threads that you will create using FreeRTOS will suffocate and not work. This will also not give you any errors so watch out for it!
The Code
After you generate the code for your board, you can look through networking component, in the ethernet.h file, to see all public Ethernet functions.
For a full guide of how to use Ethernet, I refer you to Driver usage [3].
Resources
- STM32 Ethernet (Part 1): How to configure Ethernet peripheral and perform successful ping test
- PIN schematic (Download: MB1364-H753ZI-C01 Board schematic, pg. 6)
- Driver usage
Sending your first message
This page: how to initialize your Ethernet driver and send your first message. A lot of constants can be seen in the explanatory code. Those can be found in components/common/networking_constants. They are also added at the end of this file.
The functions that are used for Ethernet can be found in components/common/networking/inc/ethernet.h.
The headers in the folder components/common/networking/stm/ are only to be used inside the Ethernet driver!
NOTE: The implementation only works with FreeRTOS, but it works fine with only 1 thread. Before you implement anything, do an introductory tutorial on FreeRTOS!
Code Usage
1) Linker file updating
In the linker file, you need to say what memory addresses LWIP uses. You set these values in Cubemx and the sections are generated for you, but you have to add it to the linker file yourself.
You can find your linker (.ld) file in components/{env_name}/firmware/
The codeblock added for the default values is:
.lwip_sec (NOLOAD) :
  {
      . = ABSOLUTE(0x30000000);
      *(.RxDecripSection)

      . = ABSOLUTE(0x30000080);
      *(.TxDecripSection)

      . = ABSOLUTE(0x30000100);
      *(.Rx_PoolSection)

  } >RAM_D2
You can just use the generated linker file and append to it, because it never gets regenerated, but you can also create a new one. If you create a new one, you have to put in the platformio configuration file that you use the new linker file. An example of how to do it is shown below. The path is relative to where the platformio configuration file is located.
board_build.ldscript = components/network_board/firmware/STM32H753XX_FLASH.ld2) Code initialization
When you first use the Ethernet driver, you have to initialize a few things.
First make sure that HAL is initialized, the D and I cache are enabled, the system clock and the memory protection unit as well. These auto-generated functions start processes that Ethernet uses.
//Initialize HAL
HAL_Init();

//Enable D&I cache (for ETH)
SCB_EnableICache();
SCB_EnableDCache();

//Start the system clock
SystemClock_config();

//Memory protection unit
MPU_Config_wrapper();
Note for debugging with SCB_EnableDCache()
When debugging and trying to step over SCB_EnableDCache(), the program will keep infinitely running unless you place a breakpoint on the next line while in active debugging mode.
ETH_Init(...)
result_t ETH_init(linkstatus_callback_t link_state_change_callback,
                  uint8_t ip[4], uint8_t netmask[4],
                  uint8_t gateway[4],
                  uint8_t mac_address[6])
For ETH_init, the link_status_change_callback can be set to NULL, to use the default function. The others have to be set. For initial testing you can set these to the same values as set in CubeMX.
Example usage of ETH_init(...)
//Example values
uint8_t ip[4] = {192, 168, 0, 223};
uint8_t mac[6] = {255, 255, 255, 255, 255, 255};
uint8_t gateway[4] = {192, 168, 0, 1};
uint8_t netmask[4] = {255, 255, 255, 0};

ETH_init(NULL, ip, netmask, gateway, mac);
NOTE on multithreading: make sure you set the stack size big enough (I use .stack_size = 1024 * 8) when setting the task_attributes for the thread Ethernet will be running in!
ETH_udp_init()
void ETH_udp_init(uint8_t sender_prio_buf,
                  QueueHandle_t *send_queues,
                  receive_callback_t receiver_callback)
sender_prio_buf
Defines the number of priority queues you use for queuing the send messages. The queues we use are freeRTOS queues. More information can be found here.send_queues
You need to pass freeRTOS queues as a pointer to an array. The queues need to be implemented before passing them toETH_udp_init(...), see below.
Example queue implementation
int SendQueueSize = 80;

//Create queue 1
static StaticQueue_t xStaticQueue1;
uint8_t ucQueueStorageArea1[SendQueueSize * ETHERNET_SQ_ITEM_SIZE]; //NOTE: constants from <ethernet_constants.h>
QueueHandle_t udp_receiver_queue1 = xQueueCreateStatic(SendQueueSize, ETHERNET_SQ_ITEM_SIZE, ucQueueStorageArea1, &xStaticQueue1);

//Create queue 2
static StaticQueue_t xStaticQueue2;
uint8_t ucQueueStorageArea2[SendQueueSize * ETHERNET_SQ_ITEM_SIZE];
QueueHandle_t udp_receiver_queue2 = xQueueCreateStatic(SendQueueSize, ETHERNET_SQ_ITEM_SIZE, ucQueueStorageArea2, &xStaticQueue2);

//queues object we pass as an argument later
QueueHandle_t queues[2] = {udp_receiver_queue1, udp_receiver_queue2};
receiver_callback
This can be any function that takes areceive_frame_t, found inethernet_udp.h. However, we also implemented a "packet dispatcher", to handle incoming packets.
More information about the packet dispatcher is in the Packet Dispatcher documentation.
Example implementation WITHOUT packet dispatcher
void HandlePacket(receive_frame_t *receive_frame) {
 printf("Wayoo, message received");
}

int main(void) {
  ...
  /*The other code examples above would go HERE */
  ETH_udp_init(2, queues, HandlePacket);
  ...
}
Now Ethernet is started and you can receive packages!
3) Sending Packets
ETH_add_arp(...)
result_t ETH_add_arp(uint8_t ip[4], uint8_t mac[6], int retry_count)To send to a certain IP, you have to set the ARP table. Otherwise, it will only send ARP resolution messages. You do that by using the ETH_add_arp(...) function with the IP you want to send to, and any random mac address.
WARNING: Make sure you have initialized udp before using ETH_add_arp(...)!
ETH_udp_send(...)
void ETH_udp_send(uint8_t ip[4],
                  uint8_t port,
                  uint8_t *payload,
                  uint16_t payload_len,
                  uint8_t prio_num)
payload
The payload can be any byte array, where the size of that byte array is the 4th argument:payload_len.prio_num
Priority level for transmission. Must be less thansender_prio_bufspecified inETH_udp_init(...).
Now you can send messages!
Example: sending a message
//NOTE: These are the receiving ip/mac,
//not the sending ones we specified earlier
uint8_t ip[4] = SAMPLE_BOARD_IP;
uint8_t mac[6] = SAMPLE_BOARD_MAC; //constants from <ip_mac_constants.h>

ETH_add_arp(ip, mac, 5);

uint8_t packet1_payload[4] = {14,06,20,04};
ETH_udp_send(ip, 8, packet1_payload, 4, 1); //Send a single packet
Appendix
1) Networking_constants
#ifndef IP_MAC_CONSTANTS
#define IP_MAC_CONSTANTS

#define SAMPLE_BOARD_IP {192, 168, 0, 111}
#define SAMPEL_BOARD_MAC {0x00, 0x80, 0xe1, 0x00, 0x00, 0x00}

#define NETWORK_IP {192, 168, 0, 223}
#define NETWORK_MAC {0x00, 0x43, 0x23, 0xee, 0x21, 0x64}

#define GATEWAY {192, 168, 0, 1}
#define NETMASK {255, 255, 255, 0}
#endif //! IP_MAC_CONSTANTS
2) Full Example Code
Import "networking_constants.h" and "ip_mac_constants.h" to use the predefined test constants
#include "ethernet.h"
#include "networking_constants.h"
#include "ip_mac_constants.h"


/* Callback function that handles a specific packet*/
void HandlePacket(receive_frame_t *receive_frame) {
    printf("Wayoo, message received");
}

int outgoing_counter = 0;
int main(void) {
    /*Inits*/
    HAL_Init();
    SystemClock_Config();

    MPU_Config_wrapper();

    SCB_EnableICache();
    SCB_EnableDCache();

    MX_GPIO_Init();

    /*Config + init sending side*/
    uint8_t mac[6] = NETWORK_MAC;
    uint8_t ip[4] = NETWORK_IP;
    uint8_t netmask[4] = NETMASK;
    uint8_t gateway[4] = GATEWAY;

    ETH_init(NULL, ip, netmask, gateway, mac);

    /*Making queues*/
    int SendQueueSize = 80;

    static StaticQueue_t xStaticQueue1;
    uint8_t ucQueueStorageArea1[SendQueueSize * ETHERNET_SQ_ITEM_SIZE];
    QueueHandle_t udp_receiver_queue1 = xQueueCreateStatic(SendQueueSize, ETHERNET_SQ_ITEM_SIZE, ucQueueStorageArea1, &xStaticQueue1);

    static StaticQueue_t xStaticQueue2;
    uint8_t ucQueueStorageArea2[SendQueueSize * ETHERNET_SQ_ITEM_SIZE];
    QueueHandle_t udp_receiver_queue2 = xQueueCreateStatic(SendQueueSize, ETHERNET_SQ_ITEM_SIZE, ucQueueStorageArea2, &xStaticQueue2);

    QueueHandle_t queues[2] = {udp_receiver_queue1, udp_receiver_queue2};

    ETH_udp_init(2, queues, HandlePacket);

    /*Config + add ARP receiving side*/
    uint8_t ip[4] = SAMPLE_BOARD_IP;
    uint8_t mac[6] = SAMPLE_BOARD_MAC;

    ETH_add_arp(ip, mac, 5);

    /*Sending a message*/
    uint8_t packet1_payload[4] = {14,06,20,04};

    /*Test sending*/
    while (outgoing_counter < 100) { //NOTE: after 80 packages the queue will be full!
          ETH_udp_send(ip, 8, packet1_payload, 4, 1);
          osDelay(10);
          outgoing_counter += 1;
          LOGI(TAG, "%d", outgoing_counter);
      }

}
Ethernet Testing
Send Testing
Requirements
- STM32
- Ethernet Cable
- Wireshark
Testing
Send testing is easy. The only thing you have to do is upload the setup and sending code to your STM32 and connect it to your PC/laptop using an Ethernet cable. Then you can go into Wireshark, look at the activity on you ethernet periphial, to see if it sends something. It also logs to the terminal if you send, if you have turned logging on.
Receive Testing
Requirements
- Linux laptop 🫠
- STM32
- Ethernet Cable
Connect the Ethernet cable between the STM and the laptop that is sending you packets. - Any pcap packet sender
We recommend packeth, installation manual will be below. - Wireshark (optional)
Installation of Packeth
NOTE: you need a Linux laptop for this
Testing
Receive testing is done by sending packets, saved in test/networking, to the STM32 using a pcap packet sender. If you want to use new packets, I advise to send the packet you want from the STM32. Then use wireshark to save the packet such that you can send it back. In wireshark you can see, when you send a package, to which IP and MAC it is being send, and it should match with your IP and MAC.
To see if the messages are received, make sure you print messages in your receive function. Then check the serial
Extra Functions
Introduction
This documentation is about extra functions, that are not necessary to get it running, but can be used if need be.
Non-deprecated functions
ETH_setup_MAC_address_filtering
This function is used for perfect mac address filtering. It is used by giving it MAC-addresses as arguments. If you receive packets with those addresses, they will also be processed.
Deprecated Functions
There are deprecated functions for raw sending (ETH_raw_send) and custom protocol receiving (ETH_custom_protocol_receiver). Those can be used if you don't want to use UDP, but I don't know if they still work.
Raw receiving
If you want to receive messages, you need to have #define LWIP_HOOK_UNKNOWN_ETH_PROTOCOL(pbuf, netif) eth_reader(netif, pbuf) in the cubemx_main.h file.
Debugging
Introduction
This documentation gives some tips on how to debug the Ethernet Driver.
Debug Flags
By setting the flag " LWIP_DEBUG" to 1 in the cubemx main file, you will get extra lwip debug messages in your terminal.
Hard Faults
While debugging, it is easy to use a debugger to go step by step through your code. However, the deeper you go into the code, the bigger the chance that your debugging will trigger an hard fault. So when that happens verify if the hard fault is your doing or not, by debugging less deep while you have a debug point set on the hard fault function, to check if it still hard faults.
Issues
Introduction
There are some issues with ethernet. Those are described here.
The Issues
Arp Table removement
The ARP function will fail when Ethernet is not started properly yet. Current fix is retry_count that retries the arp x amount of times.